The Final Step in Achieving Your Desired Outcome

Two weeks ago, we discussed the process of determining which paint is best for your project and choosing the colors. Last week I told you about the different tools and equipment you will need. Now, give me a roller, I’m ready to put some paint on the walls.
Not so fast. Using these steps and simple tips will make for less mess, a more productive use of your time and a finished project that will rival the professionals.
Start at the beginning.

Preparing the room before you open the first can of paint will pay dividends in the end. This is my recommended order, but these steps can vary for your particular situation or preference.
1 – Remove ceiling fan blade and/or light fixture globes. Cover the fixture base with masking tape and plastic.
2 – Remove furniture from the room if possible or move it to the center of the room if not. The less you have to work around the easier it will make the job. If you leave furniture in the room cover the floor where the furniture will go, set the furniture on the covering, then cover the furniture.
3 – Remove area rugs, window treatments, wall hangings (including nails and/or screws) and switch and receptacle cover plates, anything that you can, that you don’t want painted or broken.
4 – Cover floor with drop cloths, plastic or a combination depending on your preference. Drop cloths are a less slick surface and are designed to be reused. Plastic is slicker to walk on and moves around more but can be thrown away when you’re finished.
5 – Check walls for damaged areas or nail holes that need to be repaired or filled. Fill larger repairs with light weight spackle or drywall compound. Fill nail and screw holes that won’t be reused with light weight spackle or caulking. Make sure repairs are smooth and ready for paint by sanding if needed.
6 – If the window and door casing and/or the base board are going to be painted then caulk gaps between the trim and the wall. If it’s not going to be painted…
7 – Tape off window and door trim and base board with masking tape and plastic unless you’re really good with a paint brush.
8 – Clean the walls. The best way to do this depends on the finished texture of the wall. If it’s smooth, it can be wiped down with a damp cloth. If it’s textured start with a shop vac using a brush attachment and then wipe down with a damp cloth. If it has been painted prior, then clean the walls with soap or a mild cleaner and water. Make sure it’s dry before applying primer or paint.

Start at the top and work your way down. Gravity works on drips, splatters and runs just like everything else. Not to say that Paint can’t fly up off a roller, etc., but the odds are in your favor when you begin with the ceiling. The directions included here are based on painting both walls and ceiling. Just like preparing the room, this is the order I recommend.
1 – Start by cutting in the ceiling. Paint a 2”-3” strip from the wall and around fixtures on the ceiling. This allows you to get the roller close (if you’re really careful) without getting paint on the walls. The brush and roller leave the paint with a different pattern. This is why it is better to cut in with the brush first and then to roll as close to the edge as possible for a more uniform finish.
2 – Using a roller and extension pole, start at a wall on the short side of the room. Roll long strokes, maintaining a wet edge. If you’re painting unpainted drywall, I recommend using a primer. The primer provides adhesion to the surface. After the primer has dried then apply the paint. Typically, ceilings are painted with a low sheen flat finish.
3 – After the ceiling is finished next come the walls. Some people prefer to start with the millwork, and some would rather do it last. It’s up to you which you prefer. Either way when painting the walls cutting in is next thing. Start by painting a 2”-3” strip on the wall from the ceiling. Next paint a 2”-3” strip both ways in wall corners unless two connecting walls are going to be different colors. Paint a 2”-3” wide strip around all window and door casing, baseboard and any other fixed object.
4 – Using a roller and extension pole, start at a corner of the room. Working away from the corner roll long strokes, maintaining a wet edge. Just like the ceiling, if you’re painting unpainted drywall use a primer. After the primer has dried then apply the paint. I recommend putting on two coats for better coverage and durability.
5 – Once the paint has dried remove the tape and plastic. Be careful when pulling the tape that you pull away from the finished surface. This will give a cleaner finished paint line. Like with painting if you start at the top and work your way down it will make clean up easier. Pull the plastic from the corners of the room rolling it into itself, keeping the majority of the mess inside, then throw it away.
6 – Now it’s time to move things back into the room and enjoy the fresh new look. Be careful with the fresh paint for a few days, it is softer and more easily damaged until it has finished curing.
Tips and technics:
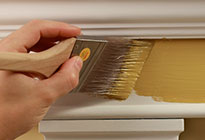
• Hold the brush close to the bristles, it gives you more control.
• Only dip ¼ to ½ of the bristles (approximately 1”-2”) into the paint. Anymore is unnecessary, it’s messier, wasteful and harder to clean up.
• To minimize drips, tap or lightly wipe one side of the bristles on the top edge of the can.
• Put holes in the bottom of the groove around the top edge of the paint can where the lid sets down in using a small punch or a nail. This allows the paint that gets caught in the groove to escape back into the can when putting the lid back on.
• When cutting in with a brush start at a corner and work away from it initially. Then reverse your direction by starting the next stroke away from the corner and working back over the previously applied paint. Continue this process with each new dipping of the brush.
• To get the cleanest paint line use a tapered brush and parallel the width of the brush with the corner. Begin with the bristles a little way from the corner and then as you move the brush parallel with the corner gradually move closer to the corner.
• When rolling paint on large flat surfaces, i.e. walls and ceilings, start in a corner. As you apply more paint move to just past the previously painted area and while rolling back and forth work back over the previously painted area. Continue this process as you work across the surface being painted. This helps prevent having thin spots and paint lines.
• Roll the paint from top to bottom on a wall, especially with higher sheen finishes. When only rolling a top or bottom portion of a wall there is a risk of there being an area of heavier coverage in the middle and often this will be visible and create a horizontal paint line on the middle of the wall.
Painting is one of the things that many times people do themselves to save money. Really, how hard can it be to just roll some paint on a wall?
As you can see in in this “How to Paint the Interior of Your Home” series of posts…there’s more to doing a painting project “well” than it appears. Before you start painting you need to consider the amount of time and effort you will spend. Even though the price for hiring a professional seems expensive, you need to determine what your time is worth. Because, it will take longer than you think.
Sherwin-Williams has a great web site for more details on How to Paint Your Home’s Interior.
If you have any paint stories or questions that you would like to share post them in the comments section below.

