

The Payment Prior to Starting
It can be hard to invoice large construction projects in a way that is fair to both the customer and the contractor. Random payments at the completion of specific portions of the project can be easy for the contractor, but they often leave the customer confused.
This is why a payment application tool is a good way to keep the customer informed about what is included in the current invoice, what has been paid previously, and what is left to pay. It’s also a good way to improve cash flow for the contractor.

In last week’s post, John helped Gene prepare his first payment application. They got the individual item numbers, description of work, and the price for each item filled out on the spreadsheet before they took a short break.
After coming back from their break …
It’s time to set up the payment prior to starting the construction project.
John starts. “In the payable portion at the bottom of the proposal, we included that there would be a payment upon the signing, one prior to starting the project, and the balance in weekly progress payments. Because of the size of the project and the fact that there wouldn’t be a large material expense before the project gets started, we decided to use 15% as that amount due prior to starting.
“If you remember, these amounts were determined at the bottom of the worksheet. What we need to do now is break the total price down for each individual item on the payment application. This will be divided into material and labor for each.
“Because you’re only charging sales tax on the labor for this project, we’ll need to separate each item into material and labor. This will be entered into columns D and E under Work Completed, one for material and one for labor.”
John then opens the payment application on the computer and puts it up on the screen so that Gene can see the columns.
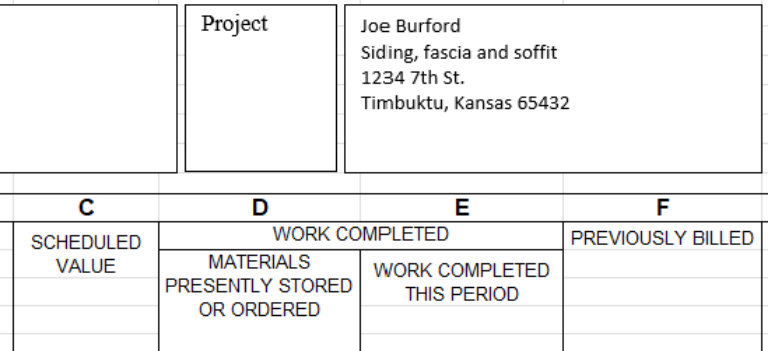
Then he splits the screen, putting the worksheet on one side and the payment application on the other.
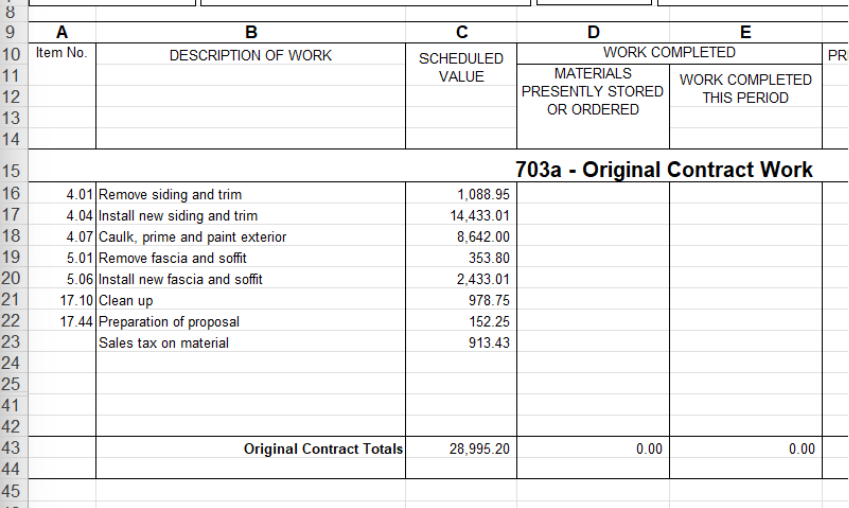
“In row 16 on the payment application, you see item 4.01 is removing siding and trim, and the price for that. To determine 15%, we’ll need to go back to the worksheet and look at how we arrived at that price.
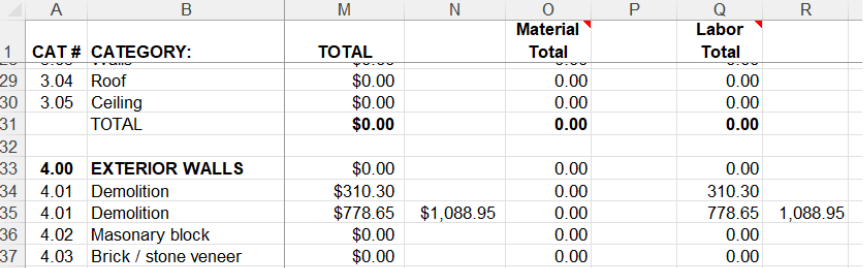
“The price for that is $1,088.95.”
After a few clicks of the keys on the calculator, John put $163.35 in column E for the payment amount for item 4.01 because it does not include any material.
“The next item on payment application is 4.04, installing new siding and trim. The price for this one is $14,433.01. Because it’s both material and labor, we’ll need to figure 15% for each individually.”
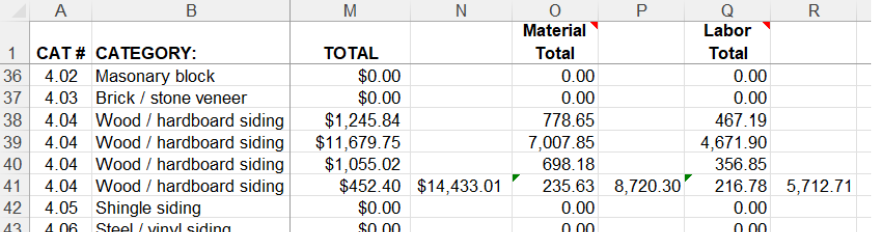
John goes back to pushing buttons on the calculator as Gene continues to look at the screen on the wall. Then John types in $1,308.05 in column D for material and $856.87 in column E for labor. The total of these two amounts is $2,164.92, which is 15% of $14,433.01.
Continuing this process, John works his way down the page, figuring 15% of material and labor for each item on the application. After confirming that the total of the two columns matches the amount on the worksheet before sales tax, he figures the sales tax for the material column and enters it. Then he compares the total of the material and labor to be sure it is the same as the payment prior to starting that is listed on the proposal.

“Do you have any questions yet?” John asks.
Gene studies the payment application on the TV, comparing it to an unsigned copy of the proposal that he brought. “What about the payment for preparing the proposal. Row 22 has that description, but there’s no price. Does it not go on the payment application?”
Smiling, John commends him. “Good job. I was hoping you’d catch that. You’re getting the hang of this.”
John then types in the $152.25 in column E on the row for preparation of proposal. “Now the payment application is ready for the customer.”
Now it’s up to Gene to get an invoice prepared using the totals of columns D and E on the payment application and then present both to Burford’s.
It’ll be interesting to see how that meeting goes.
If you’re interested too, check back and we’ll keep you posted as we know more.
If you have a construction business that needs business tools, check out the Business BUILDing Toolbox. If you have other business questions, you can schedule a free 30-minute meeting, and we’ll be glad to help you.