

Let John Show You How
After Gene got the signed proposal from Burford’s, he needed to figure out how to set up a payment plan. After all, he’s not a bank. Today, he and John are planning to meet so John can teach him about the Payment Application.

Figuring out how to get paid has always been a struggle.

At their meeting, John reviews the benefits of regularly scheduled payments:
- Stable cash flow
- Increased motivation
- Fewer payment problems
- Opportunity to pause projects
The Payment Application is an Excel spreadsheet used for tracking progress payments. It includes individual values based on the proposal and the individual items included in the scope of work. It’s a tool that shows the customer what is included in each invoice. They get updated information so they can easily see where they started, where they are, and what’s left to pay.
Pointing at the large flat-screen TV mounted on the wall, John gets started.
“Now, let’s get to work on the Burford Payment Application. You can see what the blank template header looks like on the screen. We’ll start by filling out your company name and address in the box where it says ‘Your Business Name’.
“The project information will go in the box to the right of the one that says ‘Project.’
“Then, in the empty box on the far right, you will enter the application number, the application date, a project number, if you have one, and the date the contract was signed. On future application, all you will need to update will be the application number and the date.”
Gene nods as he follows along on the screen.
“That doesn’t sound too difficult,” he says.
“It’s not,” John replies, “Now let’s move on to the actual payment information.

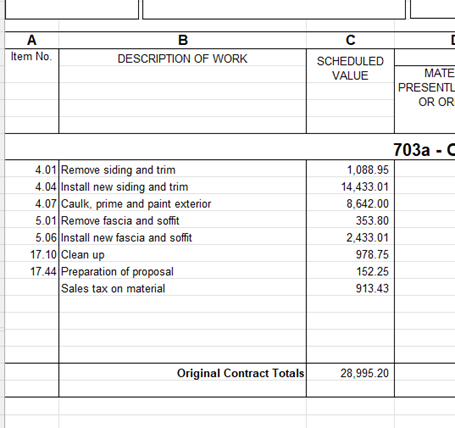
“Next, we’ll fill out the first three columns of Payment Application using information from the proposal. This will include the item numbers, a brief description of each item, and the price for each item.
“Using the proposal, we’ll take the number of the first item and enter it into the first cell of Column A, below the header.
“Next, we’ll write a description of the work in Column B. This will just be a simple reference to the work to be done.
“Finally, take the dollar amount for this item and enter it in Column C.”

John points to the first line on the screen. “Now, we’ll go down the page, repeating these actions until we have each item from the proposal entered into the Payment Application.
“If sales tax is included in this project, write that in the Description of Work column below the last description. Enter the dollar amount in the Scheduled Value column on the same line.”
John points to the bottom of the spreadsheet.
“After all the values are entered, the total at the bottom should match the total price of the project on the proposal.”
Gene looks at the total on the screen.
“So once those numbers match, we’re ready to go?”
“Exactly. Now the Payment Application is ready to go. Seeing the big project price broken down into smaller amounts helps the customer understand what it is they are paying for.”
At that, John stops and looks at Gene, “Is it making sense so far?”
Gene studies the screen for a few seconds, “I think so. What’s next?”
“Next, we’ll fill out the payment prior to starting in Columns D and E. But first, let’s take a bathroom break and get something to drink.”
If you would like to join the guys as they continue preparing the Payment Application, you can join us back here next week and follow along.
In the meantime, feel free to check out some of the other tools in the Business BUILDing Toolbox.